GenshiのTutorial4(The Data Model) 一応できた。。レベル低い。。
はてなに画像をアップしてから表示したい場所に出す方法がわからない。。。orzid:kuma8さんにフォト蔵教えてもらって対応しました。
それに時間がかかる。。。
今日は、訳レベルが低いな。。。後で見直そう。。。とりあえず進めていきます。
To continue, we'll need to first add some Python classes to define the data model the application will use.
続けるために、我々はアプリケーションが使うデータモデルを定義するために最初に多少のPythonクラスを追加する必要があります。
As mentioned above, we're using a simple pickle file for persistence, so all we need to do here is create a couple of very simple Python classes.
上記のように、我々は持続のために単純なpickle ファイルを使用しているので、我々がここでする必要があるすべては二、三の非常に単純なPythonクラスを作成することです。
model posted by (C)dai_yamashita
Inside the geddit directory, create a file named model.py, with the following content:
gedditディレクトリ内で、以下の内容で、model.pyという名前のファイルを作成してください:
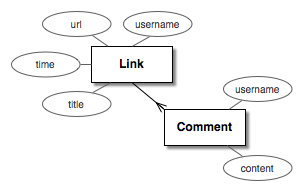
from datetime import datetime


class Link(object):

    def __init__(self, username, url, title):
        self.username = username
        self.url = url
        self.title = title
        self.time = datetime.utcnow()
        self.id = hex(hash(tuple([username, url, title, self.time])))[2:]
        self.comments = []

    def __repr__(self):
        return '<%s %r>' % (type(self).__name__, self.title)

    def add_comment(self, username, content):
        comment = Comment(username, content)
        self.comments.append(comment)
        return comment


class Comment(object):

    def __init__(self, username, content):
        self.username = username
        self.content = content
        self.time = datetime.utcnow()

    def __repr__(self):
        return '<%s by %r>' % (type(self).__name__, self.username)
You'll need to import those classes in geddit/controller.py, just below the other imports:
geddit/controller.pyで他のインポート直下にそれらのクラスをインポートする必要があります。
from geddit.model import Link, Comment
And in the main() function, let's replace the placeholder data = {} with some code to read our data from the pickle file, and write it back:
pickleファイルから例のデータを読み込むためにプレースホールダー? data= {}(辞書型)をいくらかのコードと入れ替えようとして、後ろにそれを書きましょう:(アヤシイーーー)
def main(filename):
    # load data from the pickle file, or initialize it to an empty list
    if os.path.exists(filename):
        fileobj = open(filename, 'rb')
        try:
            data = pickle.load(fileobj)
        finally:
            fileobj.close()
    else:
        data = {}

    def _save_data():
        # save data back to the pickle file
        fileobj = open(filename, 'wb')
        try:
            pickle.dump(data, fileobj)
        finally:
            fileobj.close()
    if hasattr(cherrypy.engine, 'subscribe'): # CherryPy >= 3.1
        cherrypy.engine.subscribe('stop', _save_data)
    else:
        cherrypy.engine.on_stop_engine_list.append(_save_data)
Now let's add some initial content to our “database”.
すぐに、いくらかの初期化コンテンツを例の「データベース」に加えましょう。(アヤシイーーー)
Note: You'll need to stop the CherryPy server to do the following, otherwise your changes will get overwritten.
※あなたは以下をするためにCherryPyサーバーを停止する必要があります、そうしないと、あなたの変化は上書きされるでしょう。
In the terminal, from the tutorial directory, launch the interactive Python shell by executing PYTHONPATH=. python, and enter the following code:
ターミナルから、チュートリアルのディレクトリに、 Pythonのシェルを起動して対話を実行し、 PYTHONPATH =. Pythonと、次のコードを入力します:
>>> from geddit.model import *
>>> link1 = Link(username='joe', url='http://example.org/', title='An example')
>>> link1.add_comment(username='jack', content='Bla bla bla')
<Comment by 'jack'>
>>> link1.add_comment(username='joe', content='Bla bla bla, bla bla.')
<Comment by 'joe'>
>>> link2 = Link(username='annie', url='http://reddit.com/', title='The real thing')
>>> import pickle
>>> pickle.dump({link1.id: link1, link2.id: link2}, open('geddit.db', 'wb'))
>>> ^D   # Control-Z (^Z) on Windows
You should now have two links in the pickle file, with the first link having two comments. Start the CherryPy server again by running:
あなたは今、pickleのファイルに2つのコメントを持っている最初のリンクで2個のリンクを持つべきです。 もう一度CherryPyサーバを起動し、稼動させてください:
$ PYTHONPATH=. python geddit/controller.py geddit.db